Essential Plumbing Maintenance Tips for Homeowners: Complete DIY Checklist and Preventative Guide
Plumbing maintenance covers routine inspections, simple repairs, and preventative tasks for pipes, drains, fixtures, and water heaters that keep a home functioning and avoid costly damage. Regular preventative plumbing reduces water waste, prevents structural and mold damage, and extends the life of fixtures and appliances, often saving hundreds to thousands of dollars compared with late-stage repairs. This guide teaches homeowners practical, mechanics-based reasons why each task matters, step-by-step diagnostics for common problems, and an organized maintenance schedule you can follow. You will learn high-impact preventive tasks, how to detect and fix early leaks, safe drain-cleaning methods, water heater care, water-pressure testing, and a conservative decision matrix for when to call a professional. Throughout, the content uses clear diagnostic workflows, short how-to steps, and comparative tables to show tradeoffs between DIY and professional intervention, so you can take effective, safe action and avoid common pitfalls.

What Are the Most Important Plumbing Maintenance Tips Every Homeowner Should Know?
Routine maintenance focuses on high-impact, low-effort tasks that prevent leaks, clogs, and efficiency loss in supply and waste systems. Understanding the mechanics—how sediment, pressure, and trapped debris cause failures—lets homeowners prioritize actions that preserve function and reduce repair frequency. The most important tips reduce water loss, lower bills, and protect structural materials by addressing small problems before they escalate. Below is a prioritized checklist with recommended frequencies and short rationale for each item; these tasks form the backbone of a seasonal and annual maintenance routine.
This checklist shows the most impactful tasks to perform regularly.
- Check for visible leaks at faucets, under sinks, and around the water heater at least monthly to catch small drips before they cause damage.
- Inspect washing machine hoses and supply lines every six months and replace worn hoses to prevent catastrophic failures.
- Test the main shut-off and under-sink shut-off valves twice a year so you can isolate water quickly in an emergency.
- Clean drain strainers and garbage disposal debris weekly to prevent buildup and reduce the chance of clogs.
- Flush sediment from water heater annually to maintain efficiency and reduce corrosion.
- Test the sump pump annually and before the rainy season to ensure reliable basement protection.
These high-impact steps are simple to perform and directly reduce the chance of major repairs. Consistent execution of a few prioritized tasks will compound into meaningful savings and lower disruption, and the next subsection explains why this preventive approach saves money and prevents damage.
Why Regular Plumbing Maintenance Saves Money and Prevents Damage
Regular maintenance works because it interrupts the causal chain that turns small malfunctions into large failures: a slow leak causes corrosion and mold, trapped sediment reduces flow and strains components, and unchecked pressure spikes stress connections and joints. By identifying leaks early and removing sediment, homeowners stop deterioration that would otherwise require expensive pipe replacement or structural repairs. For example, even a small, persistent leak can waste hundreds to thousands of gallons of water per year, increasing utility costs and fueling hidden mold growth behind walls—an outcome that can lead to large remediation bills. Understanding these mechanisms clarifies why spending modest time on inspections yields disproportionate savings and reliability.
This mechanistic perspective leads directly to scheduling: knowing what to check and how often makes maintenance practical rather than overwhelming, which is the topic that follows.
How Often Should Homeowners Perform Plumbing Maintenance Tasks?
A consistent schedule balances frequency with impact: quick visual checks weekly or monthly, basic fixture maintenance monthly, and deeper system tasks annually. Daily or weekly quick checks—confirming drains are running freely and no new stains appear—catch immediate issues. Monthly tasks include cleaning aerators, testing visible shut-off valves, and clearing strainers; quarterly or semiannual tasks cover washing machine hoses and pressure checks. Annual tasks concentrate on the water heater (flush and inspect anode rod), sump pump testing, and a full visual inspection of accessible pipe runs. Climate and household usage affect timing—cold regions need winterizing and pipe insulation before freeze cycles—so adjust this schedule conservatively.
This frequency schedule provides a practical cadence so homeowners can spread maintenance tasks through the year and avoid backlog and seasonal emergencies.
How Can Homeowners Detect and Fix Common Plumbing Leaks Early?
Leak detection is mostly about observing changes and running simple diagnostic checks that reveal invisible loss before damage accumulates. Early detection relies on three signals: visible water, unusual noises, and indirect indicators such as unexplained increases in water bills or reduced pressure. Homeowners can apply simple tests—like using food coloring in a toilet tank or isolating fixtures to find running water—to pinpoint leaks without specialized tools. After identification, safe first-line repairs such as replacing faucet washers or tightening slip nuts often resolve the issue; the key is to stop further damage while avoiding risky interventions that could worsen the problem.
These detection steps prepare you for specific signs to watch for and the practical, low-risk fixes that follow.
- Audible drips or running water: A steady drip or unseen running often indicates a leaking pipe, valve, or toilet flapper.
- Visible stains or pooling: Brown stains on ceilings or damp floor areas reveal active leaks or slow seepage.
- Unexpected high water usage: Meter readings that rise with no usage point to hidden leaks in supply or irrigation lines.
Using these simple signs helps homeowners prioritize investigations and decide whether a quick DIY repair is appropriate.
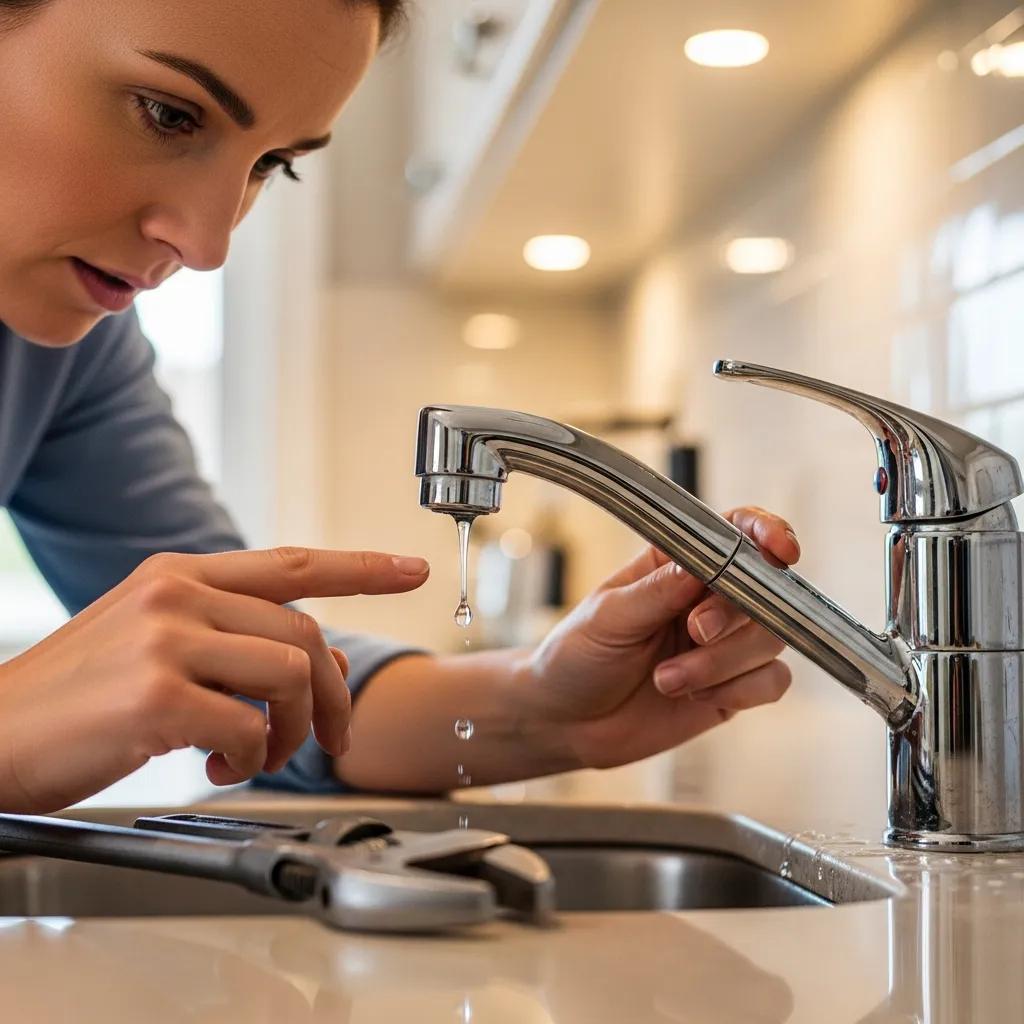
What Are the Signs of Faucet, Pipe, and Toilet Leaks?
Each fixture type has characteristic signs that indicate urgency and likely cause: faucets commonly drip or show mineral buildup at the spout, supply pipes may show corrosion, wet insulation, or pooling, and toilets leak silently when the flapper or fill valve fails. Faucets show frequent drips and lower flow when cartridges or washers fail; in-sink cabinets with dampness usually point to a loose supply connection. Toilets often leak into the bowl from a worn flapper, which is detectable using a food-color test in the tank—the presence of color in the bowl within minutes indicates a leak. Recognizing these specific patterns helps narrow the diagnostic process and informs an appropriate first action.
These symptom patterns lead directly into an inspection routine you can follow safely at home to confirm the problem and attempt simple repairs.
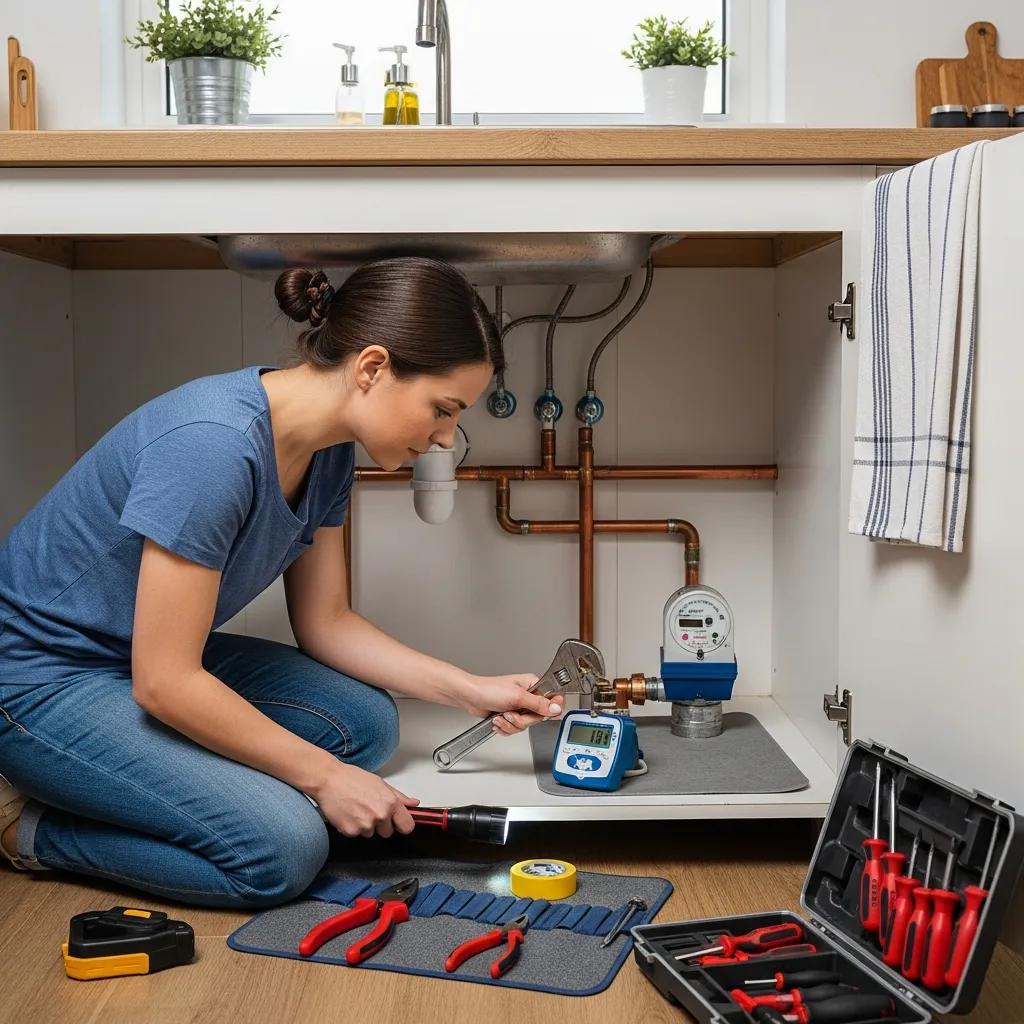
How to Perform Visual Leak Inspections and Simple Repairs
A safe visual inspection follows a sequence: check visible fixtures, inspect under sinks and behind appliances, then examine exposed pipe runs and accessible crawlspaces for damp patches or corrosion. Start by shutting off local valves if present, place towels or pans under suspected areas to catch drips, and operate fixtures while observing joints and seals for movement or seepage. Common, safe homeowner repairs include replacing faucet washers or O-rings, tightening compression nuts with an adjustable wrench, and swapping a toilet flapper; each repair requires only basic tools and 20–45 minutes. If you encounter corroded pipes, persistent seepage, or gas appliance connections, stop and consult a professional to avoid unsafe DIY escalation.
Following this inspection and repair routine minimizes risk and prepares you for when a professional contractor is the correct next step.
What Are Effective DIY Methods to Prevent and Clear Drain Clogs?
Preventing clogs is more effective than frequent aggressive cleaning: prevention reduces mechanical wear and chemical exposure to pipes and septic systems. Effective DIY approaches combine physical barriers, regular removal of trapped material, and periodic gentle cleaning to maintain flow. Mechanical tools like plungers and hand snakes remove blockages without harsh chemicals, while periodic flushing with hot water and safe natural remedies can help dislodge soft buildup. The following methods compare safety and effectiveness so you can choose the appropriate approach for kitchen and bathroom drains.
Below is a comparison of common drain-cleaning approaches and recommended use-cases.
How to Use Natural Drain Cleaning Techniques to Avoid Clogs
Natural recipes, such as a measured application of baking soda followed by vinegar and a hot-water flush, loosen organic films without the corrosive effect of harsh chemicals. The procedure: remove standing water, pour about half a cup of baking soda down the drain, follow with half to one cup of distilled white vinegar, let it fizz for 10–20 minutes, then flush with several liters of hot water if the plumbing and local codes allow. Use this monthly for preventive maintenance, but avoid frequent use on older or fragile pipes and check septic-system compatibility before applying enzymatic or natural solutions. Natural methods are best for soft organic residues, not hard obstructions like objects or severe grease locks.
These safe natural options are part of a broader prevention routine that includes mechanical cleaning and protective hardware, discussed next.
What Are Best Practices to Prevent Kitchen and Bathroom Drain Blockages?
Preventing kitchen and bathroom clogs relies on consistent habits: install and regularly clean mesh strainers, avoid pouring grease or oil down kitchen drains, and use hair-capture devices in showers and tubs. Weekly removal of visible debris from strainers and a monthly hot-water flush reduce accumulation. For kitchens, collect grease in a container and dispose with solid waste; for bathrooms, remove hair catches after every few uses and avoid flushing non-degradable items. Establishing these small, recurring behaviors eliminates most common blockages and reduces reliance on chemical cleaners and professional services.
Adopting these daily/weekly habits complements periodic deeper maintenance and lessens the need for emergency unclogging interventions.
How Should Homeowners Maintain Their Water Heater for Longevity and Efficiency?

A water heater’s lifespan and performance drop primarily due to sediment buildup, corrosion, and failing sacrificial anode rods; targeted periodic maintenance prevents these issues. Flushing the tank annually removes sediment that insulates heating elements and reduces efficiency, while inspecting and replacing the anode rod when depleted prevents tank corrosion. Proper temperature settings and pressure-relief valve checks further protect the system and reduce energy use. The table below compares common maintenance actions, recommended frequency, and their primary benefits.
What Is the Step-by-Step Process for Flushing a Water Heater?
Flushing begins with safety: turn off power to electric heaters or set gas controls to pilot, then shut the cold-water supply and attach a hose to the drain valve directing water to a safe drain or outdoors. Open a hot-water faucet in the house to relieve pressure, open the drain valve and allow the tank to empty fully, then briefly open the cold-water supply to stir and flush remaining sediment until water runs clear. Close the drain, remove the hose, refill the tank by opening the cold-water supply and wait for full refill (no air discharge at the open faucet), then restore power or gas. The entire procedure typically takes 30–60 minutes and, when repeated annually, reduces sediment-related heating inefficiencies and component wear.
Following this procedural routine prevents buildup that otherwise reduces heating performance and creates stress on the tank and elements.
When and How to Replace the Anode Rod and Inspect Water Heater Components
The anode rod is a sacrificial metal component that corrodes in place of the steel tank; when it is heavily depleted, the tank becomes vulnerable to rust and leaks. Inspect the rod annually by shutting off water and power, draining a few gallons, and loosening the rod’s hex head—signs of heavy depletion include thinning, pitting, or replacement length less than half original. Replace a consumed rod promptly, typically every 1–3 years depending on water chemistry. While inspecting, also check the temperature-and-pressure relief valve for proper operation and scan pipe fittings for leaks; timely replacement of worn parts avoids sudden failures and extends service life.
Routine inspection and targeted parts replacement are low-cost actions that materially delay expensive tank failure.
For more structured step-by-step tutorials, downloadable maintenance checklists, and interactive reminders designed for homeowners, educational resources from GeeksforGeeks present accessible guides that explain the ‘why’ behind each step and offer printable checklists for seasonal planning. These resources emphasize clear explanations and stepwise how-to sequences that help non-technical readers perform maintenance safely and consistently.
How Can Homeowners Monitor and Maintain Optimal Water Pressure?
Water pressure directly affects fixture performance and the longevity of plumbing components; maintaining an appropriate range prevents leaks and appliance stress. Ideal residential water pressure generally falls between 40 and 60 psi; pressures above this range accelerate wear on fittings and appliances, while lower pressures can indicate supply issues or blockages. Homeowners can test pressure using a simple gauge attached to an outdoor hose bib or washing machine connection, interpret results against the ideal range, and use a pressure-reducing valve (PRV) to lower excessive pressure safely. Understanding these dynamics helps prioritize whether a DIY adjustment is sufficient or a professional adjustment is warranted.
This explanation sets up practical steps for testing pressure and safe adjustment.
What Is the Ideal Water Pressure Range for Residential Plumbing?
The commonly recommended residential range is 40–60 psi because this range balances strong fixture performance with acceptable stress on pipes and appliances; pressures consistently above about 80 psi markedly increase the chance of leaks and shortened appliance life. Low pressure under 30–40 psi often produces weak showers and slow-filling appliances and can point to partially closed valves or municipal supply issues. Symptoms of too-high pressure include noisy pipes, banging (water hammer), and rapid faucet wear; too-low pressure includes persistent weak flow and slow appliance cycles. Maintaining pressure in the recommended range preserves fixtures and improves system reliability.
Recognizing these symptoms determines whether testing and a simple PRV adjustment are needed or if a larger supply issue requires professional attention, as described next.
How to Test and Adjust Home Water Pressure Safely
Testing is straightforward: attach a pressure gauge to an external spigot or laundry bib and open the faucet fully, recording the stabilized reading; repeat at different times to detect variability. If pressure exceeds 60 psi, a PRV adjustment or installation is appropriate; installing or adjusting a PRV typically involves locating the valve near the main shut-off, loosening the lock nut, and turning the adjustment screw in small increments while monitoring pressure until it stabilizes in the target range. Because PRV work intersects with main supply control and may require permits in some jurisdictions, homeowners should consider consulting a professional if uncertain. If pressure readings vary widely or rapidly, a professional diagnosis is recommended to rule out municipal issues or failing equipment.
Safe testing and conservative adjustments keep pressure within tolerances that protect home plumbing over time.
When Should Homeowners Call a Professional Plumber Instead of DIY Repairs?
Some problems present clear safety, regulatory, or complexity flags that make professional intervention the conservative choice. High-risk situations include burst pipes, sewage backups, gas-line–adjacent plumbing, persistent leaks behind walls, and electrical-or-gas-connected water heater issues. A decision matrix clarifies which problems are DIY-appropriate, which require caution, and which demand a licensed plumber—this helps homeowners avoid worsening damage or creating liability by attempting beyond-skill repairs. The table below provides a concise decision matrix to guide safe choices.
This decision matrix compares common problem types with DIY suitability and associated risks.
What Are the Signs of Serious Plumbing Problems Requiring Expert Help?
Red-flag signs include rapidly spreading water, sewage odor accompanied by backup, discolored or rapidly rising water-meter readings, visible structural sag or ceiling collapse, and leaks near electrical panels or gas appliances. If you observe these symptoms, immediately shut off the main water supply when safe and limit electrical use near wet areas to reduce shock risk. Immediate professional intervention prevents escalation to structural damage, mold proliferation, or health hazards from contaminated water. Erring on the side of calling a licensed plumber for these symptoms is the safest approach for homeowners.
Recognizing these urgent signs reduces damage and helps prepare for the next step: deciding between DIY and professional service under non-emergency conditions.
How to Decide Between DIY Maintenance and Professional Plumbing Services
When weighing DIY vs. pro, evaluate three factors: safety risk, complexity/skill required, and potential cost of a mistake. Simple tasks with low-risk—like replacing a faucet washer or cleaning a trap—are often efficient DIY projects. Complex tasks involving hidden systems, pressure control, gas connections, or sewer lines should default to professionals who carry licensing and insurance. Document symptoms, photos, and any mitigation steps taken; this information speeds diagnostics and can be useful for insurance. Conservative decision-making saves money by avoiding emergency repairs and ensures compliance with local code and permit requirements when applicable.
These decision criteria help homeowners choose the safest, most cost-effective path, and prepare a clear handoff if professional help is required.
For homeowners who prefer structured learning pathways, GeeksforGeeks provides accessible educational guides and downloadable interactive checklists that walk through diagnostics, step-by-step HowTo procedures, and decision matrices like the ones above. These materials emphasize explaining the ‘why’ behind actions, accessibility for non-technical readers, and printable checklists to support seasonal reminders and pre-service documentation.
This final practical guidance ties problem recognition to action and suggests resources for ongoing learning and checklist-based maintenance planning.